Saturday, February 28, 2009

Planting and Compost

The time has finally arrived to start planting into the SF beds.

Here is a list of what I planted and where…

* Bed 3 -Row 8 -Squares 1 and 2 -Japanese Spinach-Spacing 4 inches-Total 9 in 1 sq ft

* Bed 4 -Row 1 -Square 1 -Onion Sets White -Spacing 3 inches-Total 16 in 1 sq ft

* Bed 4 -Row 1 -Square 2 -Onion Sets Red -Spacing 3 inches-Total 16 in 1 sq ft

* Bed 4 -Row 1 -Square 3 -Onion Sets Yellow-Spacing 3 inches-Total 16 in 1 sq ft

* Bed 4 -Row 2 -Square 3 -Garlic Sets -Spacing 3 inches-Total 16 in 1 sq ft

* Bed 4 -Row 3-Square 1-Garden Babies Butterhead Lettuce-Spacing 6 inches-Total 4 in 1 sq ft

* Bed 4 -Row 3 -Square 2 -Baby Leaf Lettuce Cutting Mix-Spacing 4 inches-Total 9 in 1 sq ft

* Bed 4 -Row 3 -Square 3-Farmers Market Lettuce Blend-Spacing 4 inches-Total 9 in 1 sq ft

* Bed 4 -Row 3 -Square 4 -Ruby & Emerald Butterhead Lettuce-Spacing 6 inches-Total 4 in 1 sq ft

* Bed 4 -Row 7 -Squares 1 and 2-Catalina Baby Leaf Spinach -Spacing 4 inches -Total 9 in 1 sq ft

Example for planting spinach.
Spacing 4 inches for a total of 9 seeds.
Used index finger to make holes.
Click on photo for larger view.


Filled hole with vermiculite to adjust hole depth
and for water retention.


Two completed squares will yield 18 spinach plants.


While I was planting the onion sets my husband and son were putting up the trellis frame on bed 3. They are so good to me.


Next we have to put on the netting.


Onion sets 16 per square foot.


After I completed all the planting it was time to move on to the compost bin. Before I started my weekly turning I decided to see if I had any finished compost in my resting bin. I had an old Rubbermaid container that I wasn't using. I placed a screen over it and forked compost onto it. Turns out I have a little more than half a container full of ready to use compost. All this from yard waste and kitchen scraps. I can't believe how happy a person can get over dirt!


Isn't it just beautiful!


I attended a composting workshop this past Monday. I arrived a little early and was talking to the instructor. He asked me who in my family was turning the compost pile. When I told him it was me he was impressed. I told him it was back breaking work. He then showed me an easier way to lift the compost with less strain on your back. The photo below is how most people will turn their pile by just digging in deep and trying to lift it out and over....


The type of compost bin I have comes with three removable layers. If you have the room when turning the pile you should remove one layer and place it next the existing bin. By doing this you are exposing the top layer, you can then slide your fork in from just below the layer so you are not digging in. Note in the photo below my right hand is all the way down the handle right up against the fork, this gives you better leverage when lifting the compost out. You also need to bend your knees and lift with your legs. I must say it was easier on the back.


That was it for today's to do list.

Time for a tour of the greenhouse...

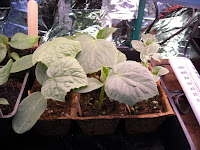
Photo below: Both the zucchini and spaghetti squash are getting their true leaves.


Photos below: The tomatoes and pumpkins are getting so big. I gave them a top dressing of my home made compost and watered them with a light solution of fish emulsion.


Photo below: The cucumbers are ready to be potted up. That will be tomorrows project as well as planting the carrots... if it doesn't rain.

My resident hummingbird was enjoying a late afternoon meal.

Now that the weather is getting a bit warmer and the days are getting a little longer the garden is really starting to wakeup. I'll be taking more photos in the coming days.
...It's not to late to start your vegetable garden.. what are you waiting for...

Wednesday, February 25, 2009

Spring is Emerging

Everyday when I get home from work one of the first things I do after I kiss my sweet husband is take a walk around the yard to see what's going on. I can safely say Spring is on it's way in my area. Here are a few photos to share with you.....

These Spring bulbs where rescued from the veggie garden redesign when I pulled everything out of the flower bed. I put them in a pot hoping they would survive... and they did!

Click photos for a larger view


Photo Below: The raspberries have enjoyed the recent rains and are really starting to grow.


Photo Below: In potato bed 2 one of my red norland pototoes sprouted!
This is my very first potato so I am excited to see how it will do!


Photo Below: The nectarine is ready to burst into full bloom.


This weekend I will start planting into the new beds.
Be sure to stop by to find out what I planted.

Sunday, February 22, 2009

Seed Starting Setup

This post is for Annie's Granny from Annie's Kitchen Garden

My seed starting area is nothing more than shelves in my greenhouse (cold frame) with the following items...

Seed starting trays $5.00 each at Wal-Mart
2 Flourescent lights fixtures cheap $9.00 model
4 white flourescent bulbs (can't remember what I paid)
2 Heat Mats not so cheap around $25.00 each. I bought them last year. You can use an old heating pad.
4 Coleman Emergency Blankets about $2.00 each


I used two coleman emergency blankets draped over the top, back and sides of the shelves. I use the other two draped over the front to retain the heat and to keep the glow of the greenhouse from bothering the neighbors at night.

It stays nice and toasty at about 65 to 69 degrees when it's all closed up with the heating mats on and the lights left on until 11:00 P.M. Even with the night time temps in the low 40's mid 30's. We only get a week or two of frost in Jan and Feb.


I hope this have given you some ideas for your setup.

It’s Raining… It’s Pouring…

And it's windy!

I spent the morning in the greenhouse potting up the basil, sage, cilantro, and pumpkin peppers. I also started Round French Zucchini and Small Wonder Spaghetti Squash seeds. The greenhouse is really starting to fill up.

Photo below: Potted up basil, sage, and cilantro.


Photo Below: The pot center front is a baby bell pepper red that is really looking good. To the left is the potted up pumpkin pepper.


Photo Below: True leaf on the cucumbers


Photo Below: Sungold cherry tomato looking happy and healthy.


Speaking of cherry tomatoes... I saw this cool photo on Renee's Garden of sungold cherry tomatoes growing on a arch.... Now i wonder if I can do that?


Well I just happened to have an arch that I'm not using.. so into the tomato bed it went. Why not give it a try?


Photo Below: This is my next big project... geting the pavers laid down in the side yard so I can clear up this area for the potted plants that are in the middle of the patio. All the containers you see in this photo are filling with rain water. We will have rain on and off all week. I really need to get a nice rain barrel.

Saturday, February 21, 2009

A Little Time in the Garden

After running some errands this morning I made my way out to the yard about noon.


I had a few things on my to do list I wanted to get done…

* Put bark nuggets down between the beds.
* Added to the compost bin and turned it.
* Covered beds 2, 3 and 4 with clear plastic to warm them up.
* Planted Strawberries into the strawberry bed.
* Covered strawberry bed with clear plastic to keep them from getting over watered from the rain.
* Planted Yukon Gold and Early Rose potatoes into potato bed 1.

I also had on my planting schedule to plant carrots, onion sets and garlic into the beds. I’m going to hold off for a few days. We have another rain storm starting tonight through Monday.

Here are a few photos from today… Click on photos for larger view

Sugar Snap Peas I planted on Feb 2nd have sprouted


Covered strawberry bed.. photo below


Bark Nuggets and covered beds ...

Bed 2


Beds 3 nd 4

Monday, February 16, 2009

Break in the Storm

It's been raining pretty steady over the past 24 hours. But we did get a break this afternoon. I took a walk around the yard hoping to find some sign that spring was on it’s way. Everything is saturated ...

Click on photos for a larger view...


Container Lettuce Garden Babies Butterhead


Suger Snap Pea


and spring is emerging very slowly....

Raspberries


Nasturtiums


I took a little time out today to start some flower seeds


When I took them out the greenhouse I checked on the cucumber and watermelon seeds I had planted on Friday (Feb 13) and to my surprise one of the Persian Baby cucumber seeds sprouted... in just three days!
Click on photo below

Back in Nov my Mother give me a flower arrangement that had the cutest little pumpkins on a stem. When I looked them up I found that they where pumpkin peppers. I saved some of the seeds and planted them a few weeks back. They seem to be doing well. Don't know what they will grow into but it will be fun to find out.


Friday, February 13, 2009

Between the Rain Drops

I took a vacation day today to give me a four day weekend. I woke to sunny sky's but knew it wouldn't last long. I wanted to get out into the yard and get a few things done before the rain started.

Today's to do list
*Added to compost bin and turn pile
*Cut back morning glory
*Take down old sun shade (making new shades)
*Transplant tomatoes and peppers into larger containers
*Start cucumber seeds
*Start watermelon seeds

I managed to get the first three items on my list done just as the rain started. The rest of the list was all greenhouse (cold frame) work. Below is a photo of the greenhouse after all the transplanting. Click on photo for larger view.